Mixed Media St. Patrick’s Day Card | Featuring Neat & Tangled
- Mar 17, 2024
- 4 min read
Updated: Jun 28, 2024
I'm back with another St. Patrick's Day project! I was searching Pinterest and found some inspiration that made me want to tackle making another card before St. Paddy's Day was over.
I used a combination of two cards for my inspiration which are pictured below from unknown sources (feel free to comment if these are yours!)


I used the ink smooshing technique for the background. I began with 4.25" x 5.5" Tim Holtz Watercolor Cardstock. I smooshed Catherine Pooler Garden Party, Lime Rickey, and Grass Skirt mini inks onto my Taylored Expressions magnetic glass board. One at a time, I sprayed them with water and moved the ink around using a paintbrush in a swirl motion. I then took my background paper and dipped it into the ink several times in different places on the panel. I heat set it with the Ranger Heat It Tool then moved on to the next color.


After I had my ink smooshing done, I began splattering some Brutus Monroe Gilded Aqua Pigment onto the panel. I did this by pouring some of pigment onto a stamp block then using a flicking motion to flick the pigment off of it with a paintbrush.
When I didn't quite get the look I was hoping for, I decided to pull out a Champagne Gold Faber Castell Gelato from my stash (Ranger Metallic Distress Crayons would work as well) and smeared some onto my glass mat. I sprayed water onto it and mixed it to break up the pigment. I then did the same as the aqua pigment and flicked it onto my panel, getting the darker specks I was hoping for.
I didn't have any shamrock dies (or any in the size I wanted to use), so I used Cricut design space to look up some shamrocks and die cut them from some Taylored Expressions Kiwi Cardstock Cardstock. I made a bunch of 3- and 4-leaf clovers in various sizes to make sure I had what I needed, so ranging from 0.75"-1.5" wide. I'm still not 100% with using my cricut so the shamrocks came out with some jagged edges, not a nice clean cut you get from metal dies, so I just used a bone folder to smooth them out and that worked just fine.
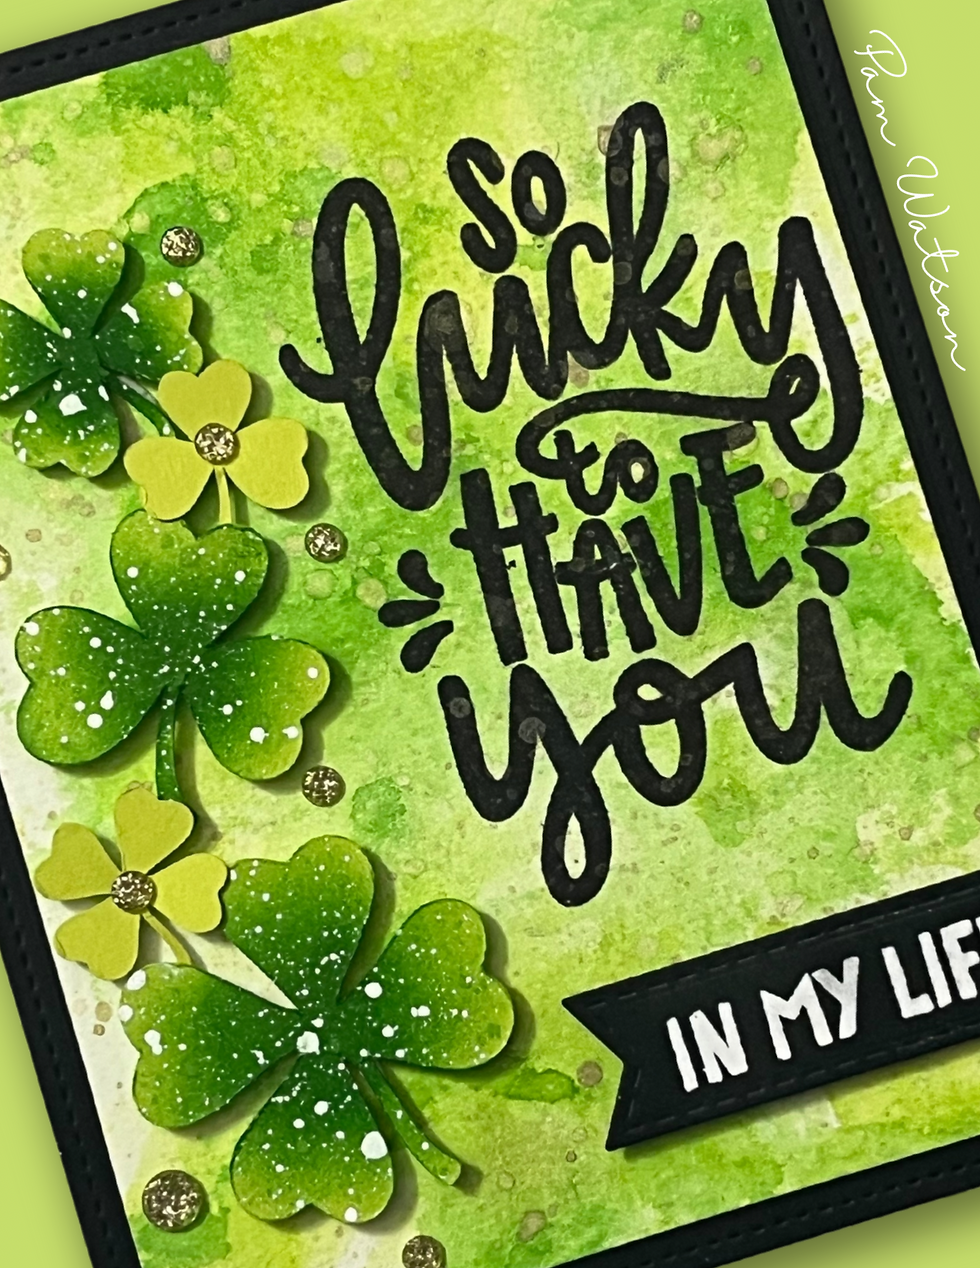
I inked the center of the shamrocks with Grass Skirt ink using a small blending brush, starting from the center and blending out towards the leaves. I also splattered some watered-down Grass Skirt ink and flicked it onto the shamrocks using a stamp block and paintbrush. Lastly, I used some Dr. Ph Martins Bleed Proof White pigment ink with a little bit of water and flicked that onto my shamrocks too. I don't know about you... but I LOVE the look of splattering - it just gives cards such an artistic look - different than clean and simple cards.
Next, I diecut a Lawn Fawn Stitched Rectangle die from some Taylored Expressions' Black Licorice Cardstock. Then I trimmed down my panel to 3 7/8" x 5 1/8" and adhered that to the black cardstock using some tape runner adhesive. I also stamped the sentiment "in my life" from the Neat & Tangled So Lucky stamp set (retired). I die cut this sentiment out using a stitched banner die from ---. I ran it through one more time to cut the banner down to an appropriate size and to get a finished stitched look all over the banner.
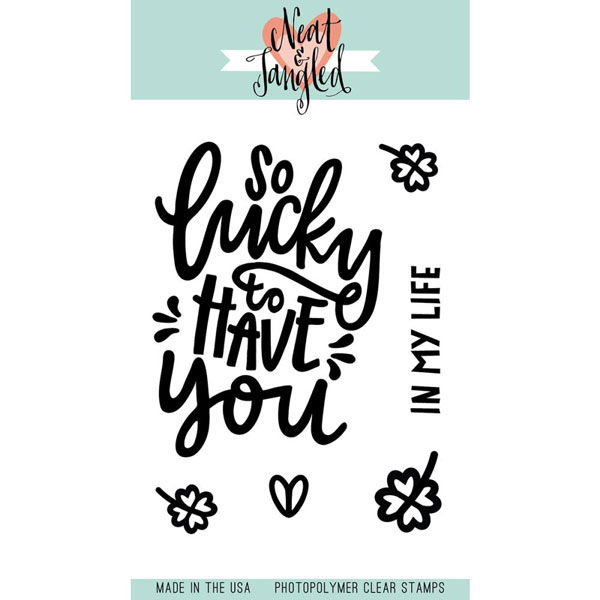
Before stamping my large sentiment, I laid the finished panel into my Mini MISTI and laid out my card elements (shamrocks and banner) to decide the position for my "so lucky to have you" sentiment. I just used some Versafine Clair Nocturne Black ink and stamped it multiple times since the panel was a bit warped from the ink smooshing (I had also run the panel through my Gemini Jr. to flatten it out some). Ideally, I would have then applied clear or black embossing powder so the gold splatters didn't show through the sentiment, but that's okay. I honestly didn't feel like redoing it, lol. I heat set this since the ink is a pigment ink.
After stamping my sentiment, I adhered the small sentiment and shamrocks (as well as some tiny un-inked shamrocks) to my panel using foam adhesive. I cut some of the foam really tiny to fit behind the shamrock stems. This isn't necessary, but I wanted a cohesive look.

Lastly, I finished off my card with some gold glitter enamel dots from my stash all around the shamrocks. I adhered the panel to a top folding Neenah Solar White card base and that finished my mixed media St. Paddy's Day card!
What crafty projects did you make for St. Patrick's Day? Feel free to share them below!
Thanks for stopping by! Happy crafting :)
Pam
Going to do some crafty shopping?
Consider using my affiliate links to help support my blog at no extra cost to you!
Tim Holtz Distress Watercolor Cardstock: https://shrsl.com/4gjcn
Catherine Pooler Garden Party Mini Ink: https://shrsl.com/4gjcw
Catherine Pooler Lime Rickey Mini Ink: https://shrsl.com/4gjcz
Catherine Pooler Grass Skirt Mini Ink: https://shrsl.com/4gjd2
Taylored Expressions Magnetic Glassboard: https://tinyurl.com/bdzcw4bb
Taylored Expressions Kiwi Cardstock: https://tinyurl.com/5n83946n
Taylored Expressions Black Licorice Cardstock: https://tinyurl.com/mr28acu6
Dr. Ph Martins Bleed Proof White Pigment Ink: https://tinyurl.com/yj4cr2yk
Ranger Heat It Tool: https://shrsl.com/4gjd9 Brutus Monroe Gilded Aqua Pigment: https://shrsl.com/4gjda Ranger Metallic Distress Crayons: https://shrsl.com/4gjde
Lawn Fawn Large Stitched Rectangle Dies: https://shrsl.com/4gjdl
Versafine Clair Nocturne Ink: https://shrsl.com/4gjdo
Neenah Solar White Cardstock: https://amzn.to/3vgvI4M
Neat & Tangled So Lucky Stamp Set: (retired)


Comments