✨ Light-Up Fairy Card - Make a Wish | Featuring Love From Lizi
- Jun 18, 2025
- 3 min read
✨ Add a touch of enchantment to your cardmaking with this whimsical light-up fairy card! It’s perfect for birthdays, encouragement, or anyone who could use a little extra sparkle.

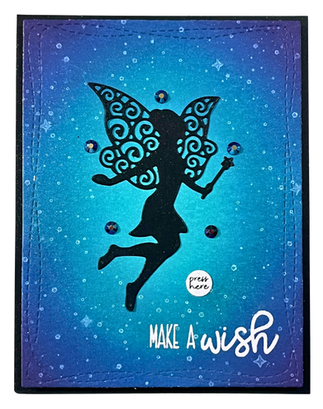
This interactive design features a silhouetted fairy surrounded by twinkling lights, set against a dreamy, ink-blended night sky. Just press the button—and watch the stars glow to life with a touch of magic!
✂️ Supplies Used
Love From Lizi Make A Wish Steel Cutting Die Set (Silhouette Fairy)
Love From Lizi Make A Wish Stamp Set ("Make a Wish" sentiment and stars)
Ranger Watercolor Cardstock
Distress Oxide Inks (Salvaged Patina, Peacock Feathers, Prize Ribbon, and Villainous Potion)
Ink Blending Tools
Pear Blossom Press Halo Light
Pear Blossom Press Stamp & Die Set
Purple/Blue Iridescent Rhinestones
Wonky Stitched Rectangle Die
White Pigment Ink
Heat Tool
Black Cardstock (for silhouette fairy and matting)
Vellum
Heat Embossing Tools (white embossing powder, clear embossing ink, embossing tool)
Foam tape and liquid adhesive
Hole puncher or Crop-A-Dile
🛠️ Step-by-Step Instructions
Create the Background:
I started by blending Distress Oxide inks—Salvaged Patina into Peacock Feathers at the center, then fading outward with Prize Ribbon and Villainous Potion for a rich night sky effect. To enhance the dreamy feel, I stamped the star cluster from the "Make A Wish" stamp set in white pigment ink across the background, giving it that soft, celestial shimmer. I then trimmed the panel using a Wonky Stitched Rectangle Die, finishing it at 4" x 5.25".

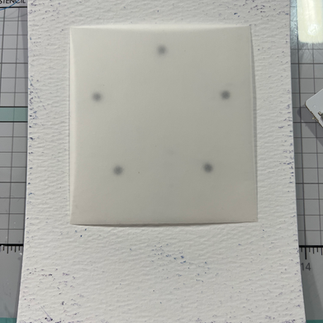
Set the Lights:
On the back of the finished background panel, I positioned the Halo light module and lightly marked where each light would shine. Using a Crop-a-Dile, I punched holes at those spots so the lights could peek through—perfectly placed to accent the fairy with twinkling stars. To diffuse the light and create a soft glow, I adhered a piece of vellum behind the panel.


Add the Sentiment:
I heat embossed the sentiment “Make a wish” in white in the bottom right-hand corner, adding a crisp, bright contrast against the dark ink-blended background and tying in the magical theme of the card.
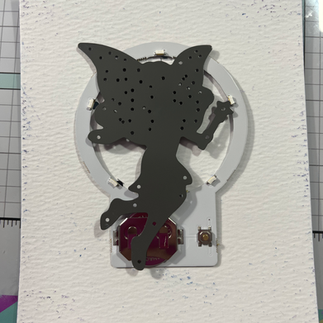
Die-Cut the Fairy:
I die cut the silhouette fairy from black cardstock and placed her in the center of the light points, allowing the soft glow to radiate around her figure. To amplify the shimmer, I added blue/purple iridescent rhinestones over each punched light spot, creating the illusion of magical teal stars twinkling in the night sky.
Assemble the Interactive Layers:
I mounted the entire panel onto a piece of 4" x 5.25" black cardstock using a double layer of foam tape, leaving room for the battery pack. The “press here” sentiment was created using Pear Blossom Press's stamp & die set, and it was placed directly over the button to activate the lights.
Final Assembly:
To complete the card, I adhered the finished panel to a black mat for bold contrast, then mounted it onto a white top-folding A2 card base for a crisp, clean look. A spray or two of sparkling shimmer was the perfect finishing detail to bring the entire scene to life.


Press the button, and the stars around the fairy glow with magic! The combination of ink blending, die cuts, and light makes this card feel truly special—like a wish coming to life.

This interactive fairy card is perfect for dreamers of all ages! Whether for a birthday or just to say "I'm thinking of you," this card is sure to make someone smile. ✨
Thanks for stopping by! Happy crafting—and don’t forget to make a wish. 🧚♀️

Going to do some crafty shopping?
Consider using my affiliate links to help support my blog at no extra cost to you!
Use my REFERRAL LINK at Taylored Expressions to get $10 OFF YOUR FIRST ORDER


Comments