



13 Days of HEROween: Day 13 + Building a Halloween Scene
Hello, crafty friends!
We have officially reached Day 13 of the Hero Arts HEROween: 13 Days of Crafty Treats! For the final card in my series, I wanted to create a project that brought several of the HEROween products together into one complete Halloween story.

Throughout the series, we have explored spooky ink-blended backgrounds, interactive elements, and ways to add detail and dimension to die cuts. For Day 13, I combined those ideas with another favorite cardmaking technique: building a scene with multiple die-cut elements.
Day 13: Trick-or-Treaters

The story behind this card is a group of costumed trick-or-treaters making their way through the neighborhood toward the haunted house at the top of the grassy hill.
A black cat dressed as a witch and a fairy carrying her treat bucket follow behind Frankenstein as he leads the way toward the house. Their bright costumes and orange treat buckets stand out against the darker Halloween setting.
Behind them, a wrought-iron fence stretches through the scene while tall, bare trees frame the colorful night sky. Black bats fly beneath a bright yellow crescent moon, and the glowing windows of the haunted house make it look as though someone—or something—is waiting inside!
I finished the card with a layered “Trick or Treat” sentiment placed over the black grassy hill.
Creating the Nighttime Background
I began with a slimline sized watercolor cardstock panel so I would have enough space to tell the entire story.
The sky was ink blended with purple at the top, pink through the middle, and a softer peachy-orange near the bottom. This combination creates a colorful Halloween sunset that feels spooky without being too dark.
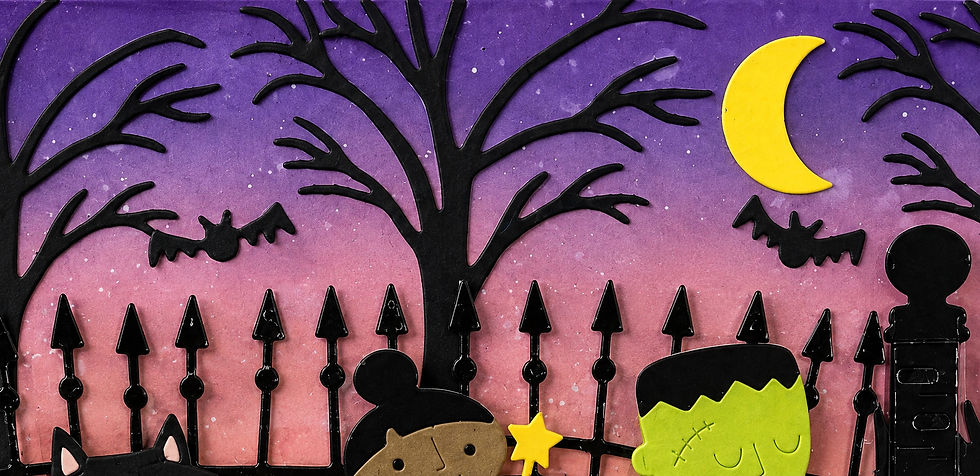
After blending, I added white splatter across the panel to resemble stars and give the background additional texture.
The colorful background also creates contrast with the black trees, fence, bats, grass, and haunted house layered over it.
Building a Scene That Tells a Story
When creating a detailed scene, I like to think about more than where each die cut will fit. I also think about what is happening in the scene.
For this card, the trick-or-treaters needed to look as though they were traveling toward a destination. I placed the haunted house on the raised grassy area at the right side of the card and arranged the characters so they appear to be moving in that direction.

Frankenstein is positioned closest to the house and slightly higher than the other two characters, making him look as though he is already beginning to climb the hill. The fairy follows behind him, while the cat dressed as a witch brings up the back of the group.
That small change in height and placement helps create movement and turns the individual die cuts into one connected story.
Working From the Background Forward
Dividing a scene into layers makes it much easier to arrange several different products.
Background
The ink-blended sky establishes the setting. I added the bare black trees, yellow crescent moon, bats, and haunted house over the sky to create the spooky nighttime atmosphere.
The haunted house was placed on the right side of the scene and backed with yellow cardstock so the windows would appear to glow. The yellow moon repeats that color and helps connect the two sides of the background.
Middle Ground
The wrought-iron fence creates the middle layer of the scene. It separates the trick-or-treaters from the trees while helping lead the viewer’s eye toward the entrance of the haunted property.
Because the fence is cut from glossy black cardstock, it adds detail without competing with the colorful characters.
Foreground
Bright green grass gives the trick-or-treaters a place to walk and introduces another classic Halloween color.

The black grass rises on the right side to form the hill beneath the haunted house. This change in height makes the house feel farther away and gives the characters a clear destination.
Finally, I placed the three trick-or-treaters across the foreground and added their colorful costumes and accessories.
Adding Detail and Dimension
Each trick-or-treater was assembled from several small die-cut pieces.

The cat wears a pale pink witch costume with a tiny bow, the fairy is dressed in purple with translucent wings and a star wand, and Frankenstein wears shades of green while carrying an orange treat bucket.
These small details give each character personality while helping them remain the focal points of the card.
I also used a combination of flat adhesive and dimensional adhesive throughout the scene. Not every layer needs foam tape. Keeping some elements flat and selectively raising others creates more realistic depth than placing everything at the same height.
Scene-Building Video Tutorial
To go along with this final HEROween reveal, I’m also sharing a video tutorial focused on scene building.
In the video, I’ll demonstrate how to:
Begin with a simple story or idea
Choose the focal point and destination
Divide a scene into background, middle-ground, and foreground layers
Arrange multiple characters so they appear to be moving
Use height and overlapping pieces to create depth
Repeat colors throughout the design
Combine several die sets without overcrowding the card
Test an arrangement before permanently adhering the pieces
You can use these techniques with the HEROween products or with stamps and dies already in your crafty stash.
Watch the scene-building video tutorial below:
Scene-Building Tips
When creating your own card scene, try these tips:
Begin with a story. Decide who is in the scene, where they are, and what they are doing.
Choose a destination or focal point. On this card, the haunted house gives the trick-or-treaters somewhere to go.
Work from back to front. Begin with the sky and distant elements before adding the middle and foreground layers.
Use overlapping pieces. Overlapping the fence, grass, characters, and hill creates depth.
Vary the height of the characters. Small differences in placement can make them appear to be walking or climbing.
Repeat a few colors. The yellow moon and windows, orange buckets and sky, and purple costume and sentiment help connect the design.
Arrange everything before gluing. Move the pieces around until the scene feels balanced, then take a quick photograph so you can remember their placement.
Know when to stop. Leave enough space around the characters and sentiment so the important details are still easy to see.
Bringing the HEROween Series Together
This final card was the perfect way to complete my 13 Days of HEROween projects because it brings together many of the techniques explored throughout the series:
Spooky ink blending
White background splatter
Detailed die-cut assembly
Added texture and dimension
Layering to create depth
Combining several products into one complete scene
Although the finished card contains many pieces, it was created one section at a time. Starting with a simple story and working from the background toward the foreground made the project much easier to plan.
Thank you for joining me throughout all 13 Days of HEROween! I have loved opening each surprise, creating a new card for every day, and discovering how the products could be used individually and together.
Which HEROween card was your favorite? Would you follow these trick-or-treaters up the hill to the haunted house? Let me know in the comments!
Thanks for stopping by! Happy crafting :)





Comments